LAFEDM2H6
IA Caslte Wikiiiii
AI Castles for Dummies                 

This guide will show you how to destroy all Stronghold Kingdoms AI castles

Introduction

I realized that many players, beginners or even sometimes at high level, don't always know very well how to attack AI castles, that's why I had the idea to share my little experience of destroying castles (I'm 170th in World 1 in 3 and a half months of gameplay). Of course, there are many ways to attack AI castles, the ones I'm going to present here are not necessarily the best and you can of course adapt them as you wish. The battles presented here were made with archers and pikemen maxed out. The catapults are half upgraded.

When you attack an AI castle, you must always know whether you are attacking "for honour" or "for destruction".
- For Honor: The goal is to regain as much honor in the castle as possible, so you will seek to kill as many soldiers in the castle as possible at the cost of higher losses in your own army. Indeed, honour is partly given by the number of soldiers killed and not only by taking the castle itself.
- For Destruction: The goal is to destroy the castle, most often because it is on your provostry, it lowers your popularity and you want to destroy it with the least possible loss of troops.
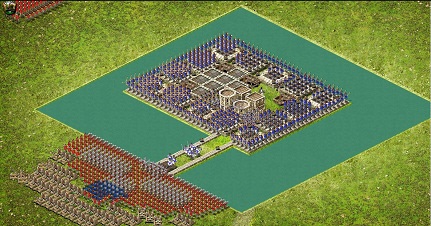
        I will classify the castles in order of difficulty and by "family of castles". This classification is of course subjective and a castle may seem easier to you while I find it harder and vice versa. Absolutely all AI castles can be taken at once, except the 3 biggest wolf castles, 8, 9A and 9B (and again, there may be players who can do 8 and 9A in one wave).

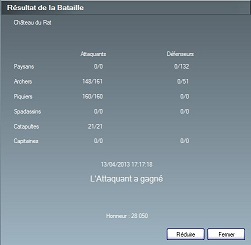
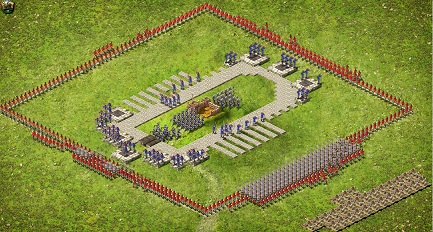
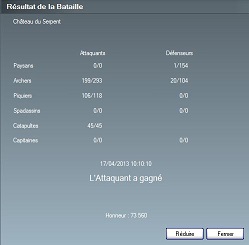
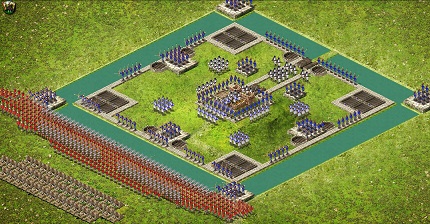
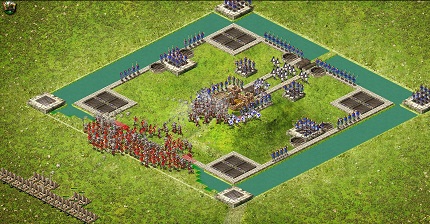
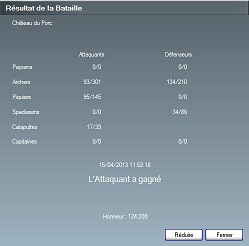
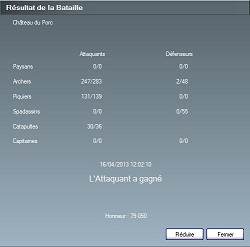
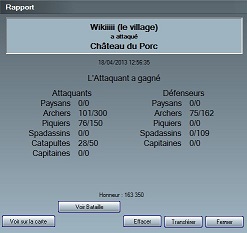
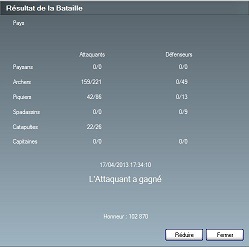
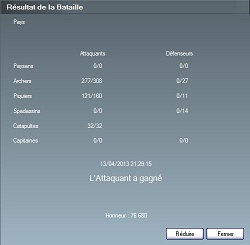
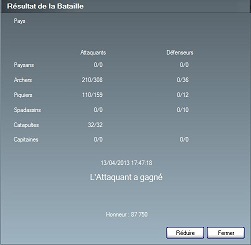
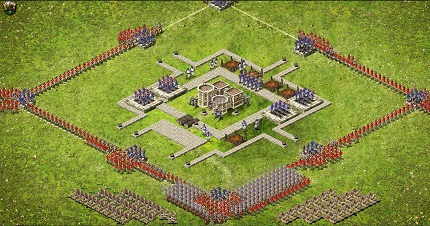
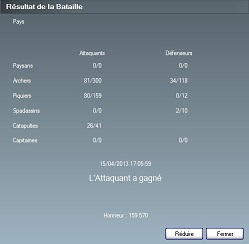
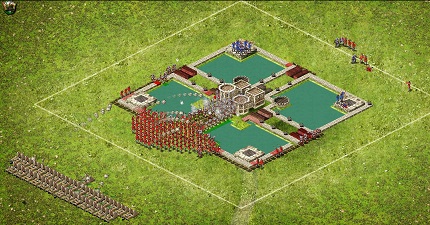
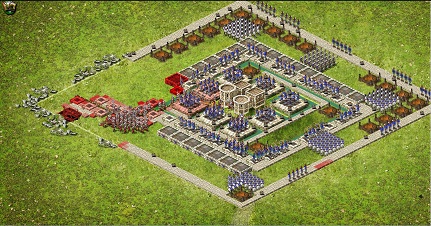
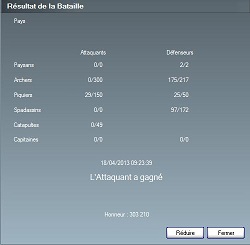
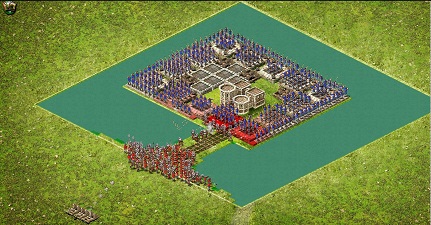
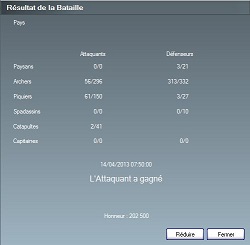
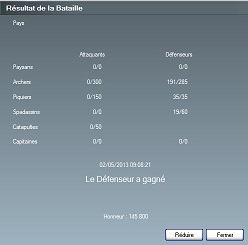
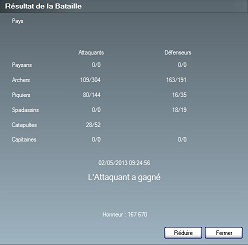
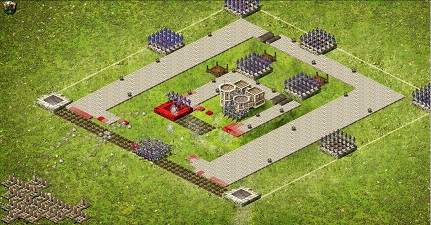
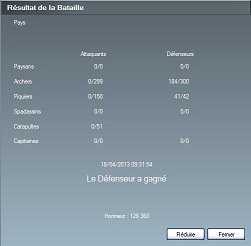
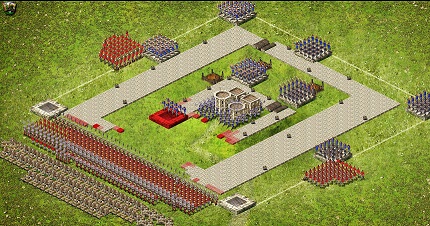
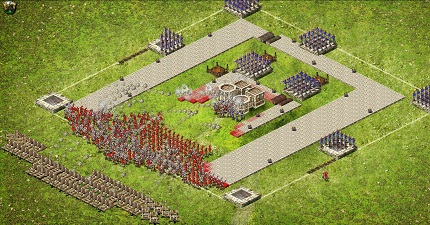
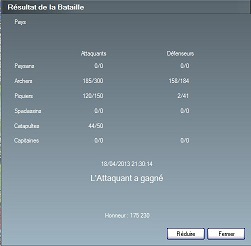
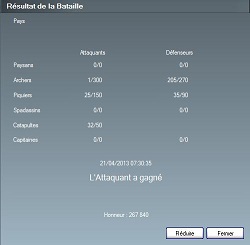
My standard army, which I stock in all my vassals, consists of 300 archers, 150 pikemen and 50 catapults.
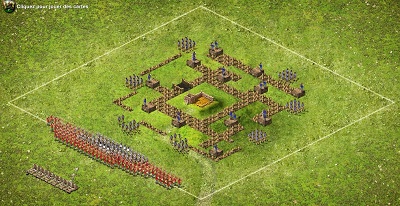
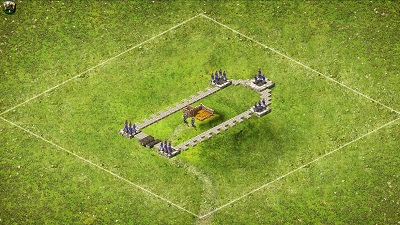
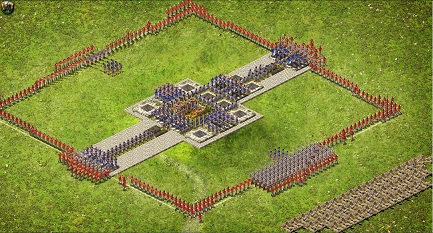
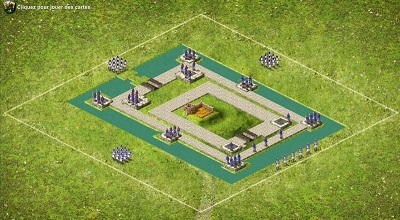
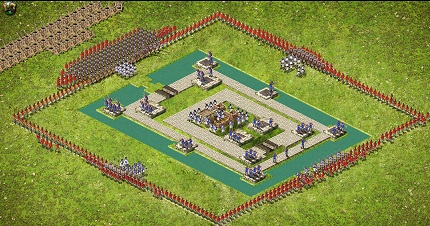
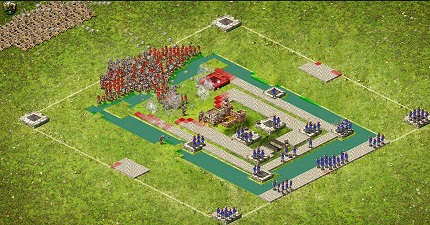
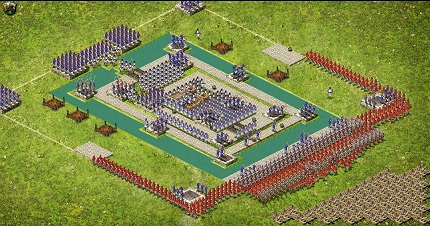
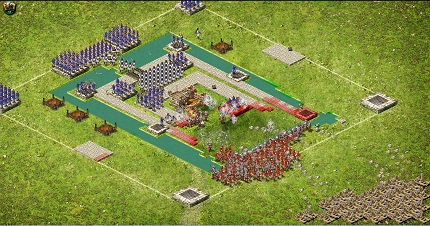
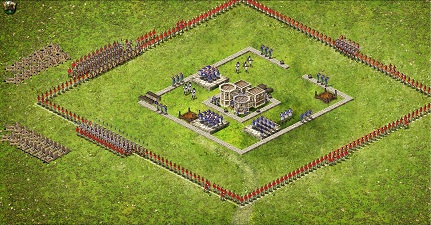
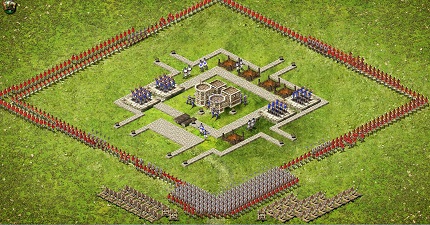
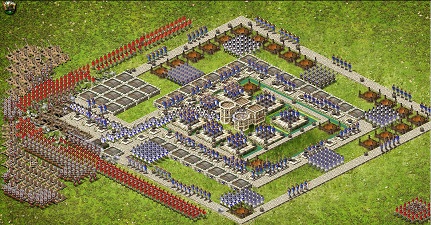
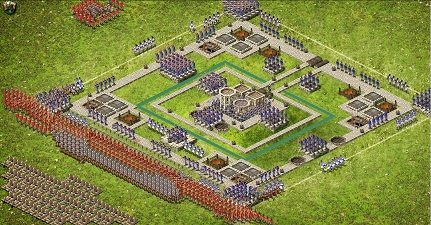
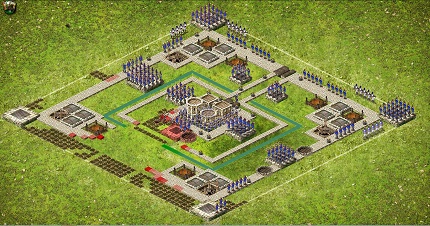
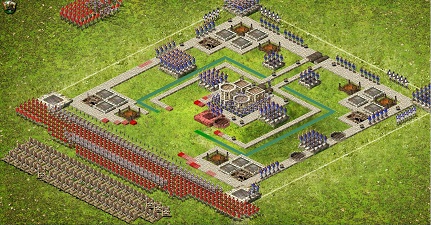
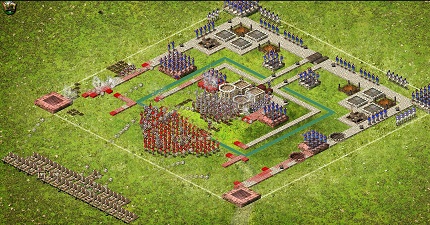
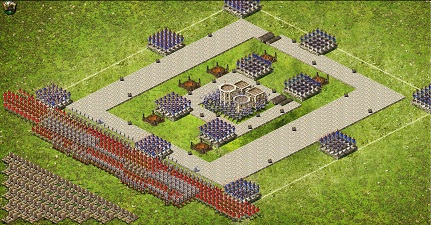
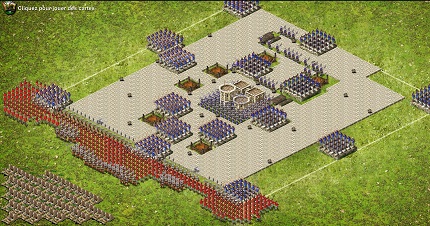
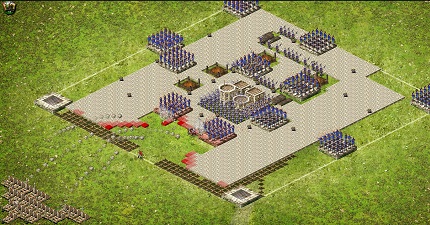
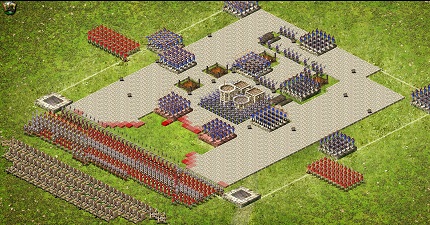
I will talk in this tutorial about side 1 for the bottom left side, 2 for the top left side, 3 for the top right side and 4 for the bottom right side (1lower left in front of the entrance of the fort and then turn clockwise).
WARNING: this tutorial gives the complete solution for all AI castles, if you want to find by yourself how to destroy them, don't read it!
Castles of the Rat
Defenders: armed peasants + archers
Defences: palisades + wooden towers

Rat 1

I've personally never met a castle like this.

Rat 2

The easiest of all castles. Sending melee troops (pikemen or spadassins, to the worst peasants) in 1 will be enough to quickly reach the dungeon. If you want to speed things up, add catapults and archers. To gain maximum honor, put archers all around to make sure you kill all the soldiers in the castle.

This castle is common and everyone knows it by heart. The technique is the same as for the other one: you put archers all around and pikemen in 1. Some catapults can help but are not absolutely necessary.
Castles of the Snake
Defenders (+10% of life): armed peasants or pikemen + archers
Defences: stone walls + 3x3 towers + 4x4 towers

Snake 1

Rare castle, very few defenders, men on foot will suffice. Make sure you kill everyone by placing archers in 3.

Snake 2

I'm used to attacking this castle in 4 but an attack in 1 or 2 can do very well. Again, to be sure to kill all the soldiers, you have to surround the whole castle with archers. Don't forget to place pikemen in 1 to "tanker" the pikemen closest to the gate and going out through it.

Also be careful with the placement of your catapults, don't put them too close to the towers if you don't want to lose any.

Snake 3

Snake 3

For this castle, I also make an attack in 4, an attack in 2 can also work. It will be necessary to make this castle a minimum of catapults to blow the 2 medium towers in 4 so that the pikemen can pass more easily. Do not forget to place pikemen at the entrances in 1 and 3 to "tanker" the peasants who go out. Be careful, here also, to place the catapults which can be hit if placed too close.
Castles of the Pig
Defenders (+30% of life): spadassins + archers + knights
Defences: stone walls + 3x3 towers + 4x4 towers + 5x5 tower + cauldrons + moat (+1 with turrets)

Pig 1A

I've never personally met him, he's very simple because he's empty.

Pig 1B

I don't remember meeting him either. It is also very simple, because it is empty. A few catapults will be necessary.

Pig 2

Pig 2

A castle I don't like, it brings little honour for rather high losses. I've never found a good solution for this castle, the problem is that it's surrounded by a moat that will have to be dug anyway... I got used to attacking it in 1 "for destruction" A line of pikemen digs while the archers duck as fast as possible the pig archers who will inevitably make losses among your catapults. I think we can do without catapults for this castle, the walls are thin. Another tactic "for honor" is to place a first wave with a double row of archers all around the castle to kill as many people as possible and then a second wave to "finish" the castle. I advise against trying to take it by the side 3 even if there is a thin path, indeed, the pikemen or spadassins are threaded on this path (trapped by the way) one by one and are simply shot down one after the other by the archers.
WARNING: NEVER put archers directly in contact with staves or they will start digging stupidly
from the beginning to their death instead of shooting! So either move them back one square or place a row of pikemen in front of them.

Pig 3A

Easy castle with nobody inside. Rare. Attack in 2.

Pig 3B

Fairly simple and profitable castle in honor given the fairly low losses. The attack is made by the side 2 with archers all around to kill a maximum of people. Do not forget to put pikemen to "tanker" the few spadassins around.

Pig 3C

Pig 3C

From this castle, it becomes difficult to kill everyone in one wave, so it's no longer interesting to put archers all around in my opinion. On the contrary, we will try to kill the archers in 2 as quickly as possible so that they destroy as few catapults as possible. To improve the honor, I have here formed a double row of archers in 1 and 3. Again, do not forget to "tanker" the spadassins with pikemen placed in the appropriate places.
TRICK: It is important to send a few pikemen (4 or 5) in a 1st suicidal wave or you won't even get a report to trigger the pitch pots !!!

Pig 3D

Pig 3D

Now it's getting complicated! I present you with images of the tactic "for destruction". The only way to destroy this castle in one go is to attack from side 4, that is the side with the fewest people. This is the only way to avoid the 100 archers and the 50 spadassins of the 2, as you can see on the end picture. The losses will inevitably be important.

To make this castle "for honour", you have to make a wave with practically only archers by concentrating the archers in 2 then make an attack in 2 instead of an attack in 4.

TRICK: Don't forget, once again, to send a few suicidal pikemen in a forward wave to set off the pitch pots!
Wolf Castles
Defenders (+50% life): pikemen + spadassins + archers + knights + peasants (tunnel)
Defenses: stone walls + 5x5 tower + cauldrons + trapped pits + moat + turrets + ballista

Wolf 1

Wolf 1

Fairly easy castle, I always made a corner attack between 1 and 2 that works well. The crown of archers makes it possible to kill everyone and quickly finish the pikemen of the fort. Don't forget to put a dozen pikemen in 3 to trigger the traps, pitch pots and tanker the few troops that come out. Don't place your catapults too close to the big towers where the archers can shoot very far.

Wolf 2

Wolf 2

Another simple enough wolf castle where you can kill everyone with a crown of archers.

TIRICK: Tan the traps in 2 and 4 with pikemen!

Wolf 3A

Wolf 3A

Another easy enough wolf castle for which I make a corner attack between 1 and 4. We're also making a crown of archers here to kill everyone. We reinforce the corners with the big towers of a double row of archers. I put 5 pikemen per entrance to trigger the pitch pots and tank the few troops and knights who usually come out in 1.

Wolf 3B

Wolf 3B

A castle much more painful than the previous one (but which brings double the honor) because of the presence of these 8 medium towers on the periphery which will destroy catapults. You won't be able to kill everyone in this castle. On reflection, the corner attack for this one may not be the best solution... Habits aren't good...

The attack presented is an attack "for honour"; it is undoubtedly possible to lose fewer troops by forming a more compact group (the crown of archers is abandoned).

Wolf 4

Wolf 4

This castle is not that difficult and very profitable, but you will still need quite a few catapults to clear the passage in 1. The crown of archers accompanied by good packs of pikemen in front of the different entrances works rather well.

IMPORTANT: you MUST put troops behind the catapults in 1 because there is a peasants tunnel! If you forget this detail, your wave won't pass!

Loup 5

Loup 5

I confess that I don't know very well this castle of intermediate difficulty and whose destruction is very profitable considering the losses. I opted here for a half-crown made up of one row of pikemen and three rows of archers. It works, but it is certainly not the best solution. This castle is not very difficult because there are not many people on the ground.

WARNING: the peasants tunnel is in 4, it's not very serious if you forget it because there are few peasants and the conformation of the castle forces you to put archers in the corners.

Wolf 6

Wolf 6

This imposing looking castle is actually quite simple to take at once with a huge gain in honour. It is, for me, the most profitable of all AI castles.  You just have to knock down the 2 gates and the ballists by making a corner attack between 1 and 2 and trying to break the walls of the narrow passage leading to the fort as much as possible. There are in fact only a few troops in this passage and they are, moreover, "mobile" spadassins, who come towards you, so quite fragile.

WARNING : don't forget the peasants tunnel which is located in 4.
This castle can also be attacked "for honour" in 2 attacks. The first wave is almost exclusively made up of archers that we organize in double or even triple crown all around the castle, we can even do without catapults for this first wave. Be careful not to stick the archers to the walls, otherwise they would stupidly break the wall and take the pitch pots. These archers will thus kill all the pikemen and spadassins located behind the first enclosure, which is a colossal gain of honour! The 2nd wave will aim to bring down the castle.

Wolf 7

Wolf 7

This castle of the wolf can also be taken in one go and is quite profitable, you don't have to worry about the archers and just go to the fort by breaking the walls of the passage and if possible the big tower at the end of the passage (not like on the example...) In the end, my example shows that even if you don't break this tower, it's ok! To succeed in this castle you must try to "hold" its pikemen, indeed, they must fight the enemy troops while remaining within reach of your archers, otherwise they will be uselessly decimated by the archers of the wolf.

WARNING: The peasants' tunnel is in the upper left corner.
This castle can also be attacked "for honor" in a single attack the goal is to break practically the whole castle, placing catapults on all sides, placing archer to prevent the pikemen from advancing, not forgetting to place archers on the peasants' hole. This castle, as a son of the ages and times, can bring back nearly 5,000,000 in honors, which is a truly colossal gain of honor!

For more details and a video see the tutorial IA

Wolf 8 1st wave

Wolf 8 1st wave

Difficult castle, which I've never been able to make in a single wave so far, but I hear it's doable... Here I show you a classic 2 wave attack in 1. Remember to fill your archers' corners.

WARNING : peasants tunnel in 2

TRICK: Try to drop the pitch pots on the side you are attacking in a suicide wave before you attack.

Wolf 8 2nd wave

Wolf 8 2nd wave

The 2nd wave is almost identical to the 1st, remember to pound the fort well with your catapults to injure the pikemen there before your own troops make contact and don't forget the peasants' tunnel.

Wolf 9A 1st wave

Wolf 9A 1st wave

I show here how to take this big castle in 2 waves but it is absolutely certain that we can do it in one with a little more catapults and the catapults maxed out. The last 2 castles that I show are difficult to take you in the end not very profitable in terms of honor compared to the losses, especially if you do them in several waves. There is no tunnel in this castle. These last 2 castles are close to a Pvp castle attack and are a good training. Don't forget to install big bundles of archers in the corners to clean the towers and kill the knights.

Wolf 9A 2nd wave

Wolf 9A 2nd wave

During the 2nd wave, don't forget to pound the fort with the catapults. Indeed, this "artillery fire" will make it possible to damage the pikemen or even to kill them before reaching them and not to remain blocked too long at their level by being destroyed by the wolf archers. This shelling must also be done during an attack in a wave, which requires bringing catapults closer together and results in losing many of them.

Wolf 9B 1st wave

Wolf 9B 1st wave

This castle is the most difficult AI castle, I don't think it's possible to bring it down in a single wave. The first wave aims to kill all archers on edge 1 and start breaking through the walls. Don't forget to fill in the corners to kill the archers and block the knights.
There is no peasant tunnel in this castle.

Wolf 9B 2nd wave

Wolf 9B 2nd wave

In the 2nd wave, destroy the 2 remaining towers in 1 and pound the fort to kill the many pikemen there. Normally it should pass... Catapults upgraded to the maximum are not in my opinion a luxury for this castle which is really painful when it appears in your provostry.
I found this tutorial, which is dated, but is still very good, I do not remember where, but I want to thank Wikiiiii for this one, if you know him let me know, I asked around if he had players who know him IRL to contact him, but I could not find anyone.
LAFEDM2H6